> ## Documentation Index
> Fetch the complete documentation index at: https://rabbitpay.ai/documentation/llms.txt
> Use this file to discover all available pages before exploring further.
# Generate Meta Pixel Access Token
> Generate the Meta Pixel ID and Conversions API Access Token required to connect Meta Pixel with RabbitPay.
## Overview
RabbitPay requires the merchant's **Meta Dataset/Pixel ID** and **Meta Conversions API Access Token** to configure the Meta integration for server-side event tracking.
There are two ways to identify the connected dataset:
* **Through Shopify** — if Facebook & Instagram is already connected to the Shopify store, the connected dataset and its ID are visible directly inside Shopify Admin.
* **Through Meta Events Manager** — the dataset can also be accessed directly at [eventsmanager.facebook.com](https://eventsmanager.facebook.com/).
The **Access Token** itself is always generated from **Meta Events Manager**, under the selected Dataset's settings.
This setup is a one-time step during RabbitPay onboarding. Once the Dataset/Pixel ID and Access Token are configured, RabbitPay will automatically forward purchase, checkout, and other conversion events to Meta on the merchant's behalf.
## Prerequisites
Before starting, the merchant should have:
* Access to their **Shopify Admin**.
* **Facebook & Instagram** connected to Shopify, if using the Shopify method.
* Access to the correct **Meta Business account**.
* Permission to access the required **Dataset** in Meta Events Manager.
## Step 1: Find the Dataset / Pixel ID through Shopify
Use this path inside Shopify Admin to locate the connected Meta Dataset:
```text theme={null}
Shopify Admin
↓
Facebook & Instagram
↓
Settings
↓
Share data
↓
Behavior will be tracked with this dataset
```
Sign in to the merchant's Shopify store as an administrator.
From the **Sales channels** section in the left sidebar, click **Facebook & Instagram**.
Inside the Facebook & Instagram channel, open the **Settings** page.
Scroll down until you find the **Share data** section.
Under **Behavior will be tracked with this dataset**, identify the connected Meta Dataset.
Copy the Dataset/Pixel ID displayed just below the dataset name. This is the ID required for RabbitPay configuration.
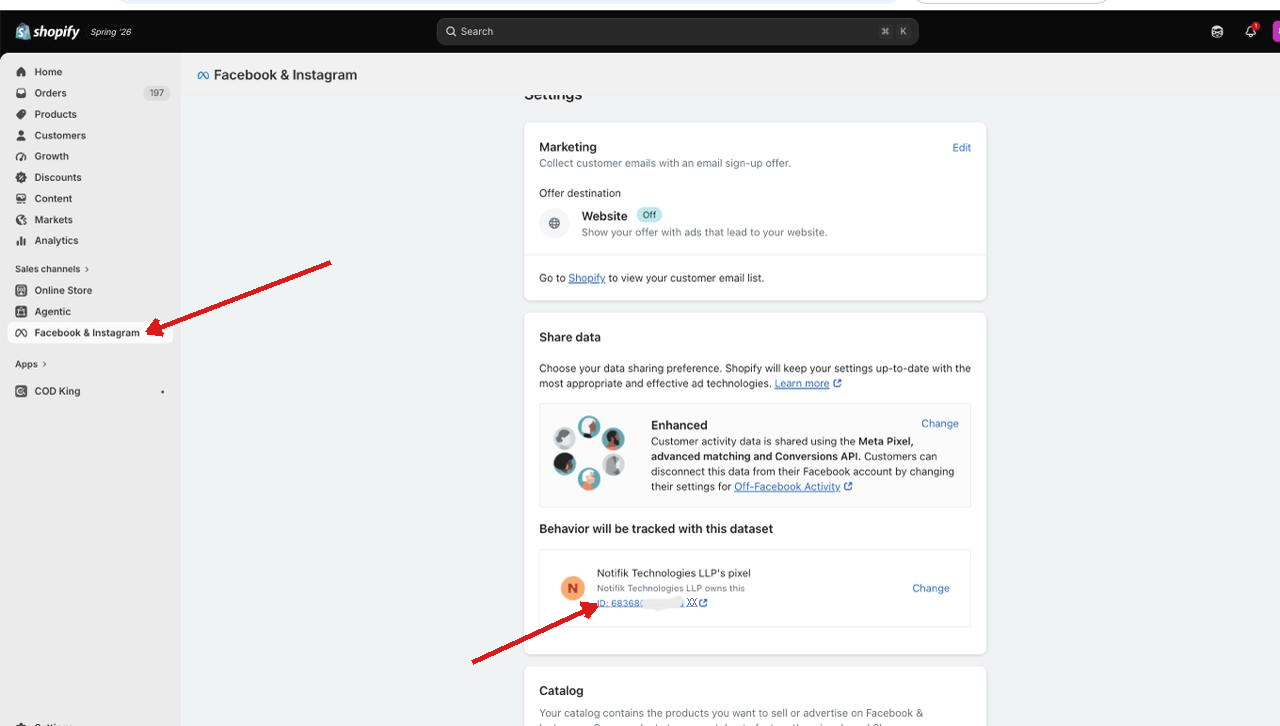 For security and privacy, never expose the complete Dataset/Pixel ID in public documentation screenshots. Mask at least one or two digits of the ID before publishing.
### Alternative — access the Dataset directly
The merchant can also access the required dataset directly through **Meta Events Manager** at [eventsmanager.facebook.com](https://eventsmanager.facebook.com/).
```text theme={null}
Meta Events Manager
↓
Datasets
↓
Select the required Dataset
↓
Settings
```
Make sure the selected Dataset corresponds to the correct Shopify store or business before proceeding. Using the wrong Dataset will result in events being reported against the incorrect Pixel.
## Step 2: Open Dataset Settings
Go to [eventsmanager.facebook.com](https://eventsmanager.facebook.com/) and sign in with an account that has access to the correct Meta Business.
From the left navigation, select **Datasets**.
Choose the Dataset that matches the ID identified in Step 1.
Open the **Settings** tab from the top navigation of the Dataset detail page.
Scroll down until the **Set up direct integration** section is visible.
Navigation summary:
```text theme={null}
Meta Events Manager
↓
Datasets
↓
Select Dataset
↓
Settings
↓
Set up direct integration
```
## Step 3: Generate the Access Token
Inside the **Set up direct integration** section:
Review the direct integration options shown by Meta, including the recommended **Set up with Dataset Quality API** option.
Find the **Generate access token** button under the direct integration options.
Click **Generate access token**. Meta will generate a new Conversions API Access Token and display it on screen.
Copy the Access Token immediately from the dialog.
Store the token in a secure password manager or credentials vault. It will be required during RabbitPay configuration.
For security and privacy, never expose the complete Dataset/Pixel ID in public documentation screenshots. Mask at least one or two digits of the ID before publishing.
### Alternative — access the Dataset directly
The merchant can also access the required dataset directly through **Meta Events Manager** at [eventsmanager.facebook.com](https://eventsmanager.facebook.com/).
```text theme={null}
Meta Events Manager
↓
Datasets
↓
Select the required Dataset
↓
Settings
```
Make sure the selected Dataset corresponds to the correct Shopify store or business before proceeding. Using the wrong Dataset will result in events being reported against the incorrect Pixel.
## Step 2: Open Dataset Settings
Go to [eventsmanager.facebook.com](https://eventsmanager.facebook.com/) and sign in with an account that has access to the correct Meta Business.
From the left navigation, select **Datasets**.
Choose the Dataset that matches the ID identified in Step 1.
Open the **Settings** tab from the top navigation of the Dataset detail page.
Scroll down until the **Set up direct integration** section is visible.
Navigation summary:
```text theme={null}
Meta Events Manager
↓
Datasets
↓
Select Dataset
↓
Settings
↓
Set up direct integration
```
## Step 3: Generate the Access Token
Inside the **Set up direct integration** section:
Review the direct integration options shown by Meta, including the recommended **Set up with Dataset Quality API** option.
Find the **Generate access token** button under the direct integration options.
Click **Generate access token**. Meta will generate a new Conversions API Access Token and display it on screen.
Copy the Access Token immediately from the dialog.
Store the token in a secure password manager or credentials vault. It will be required during RabbitPay configuration.
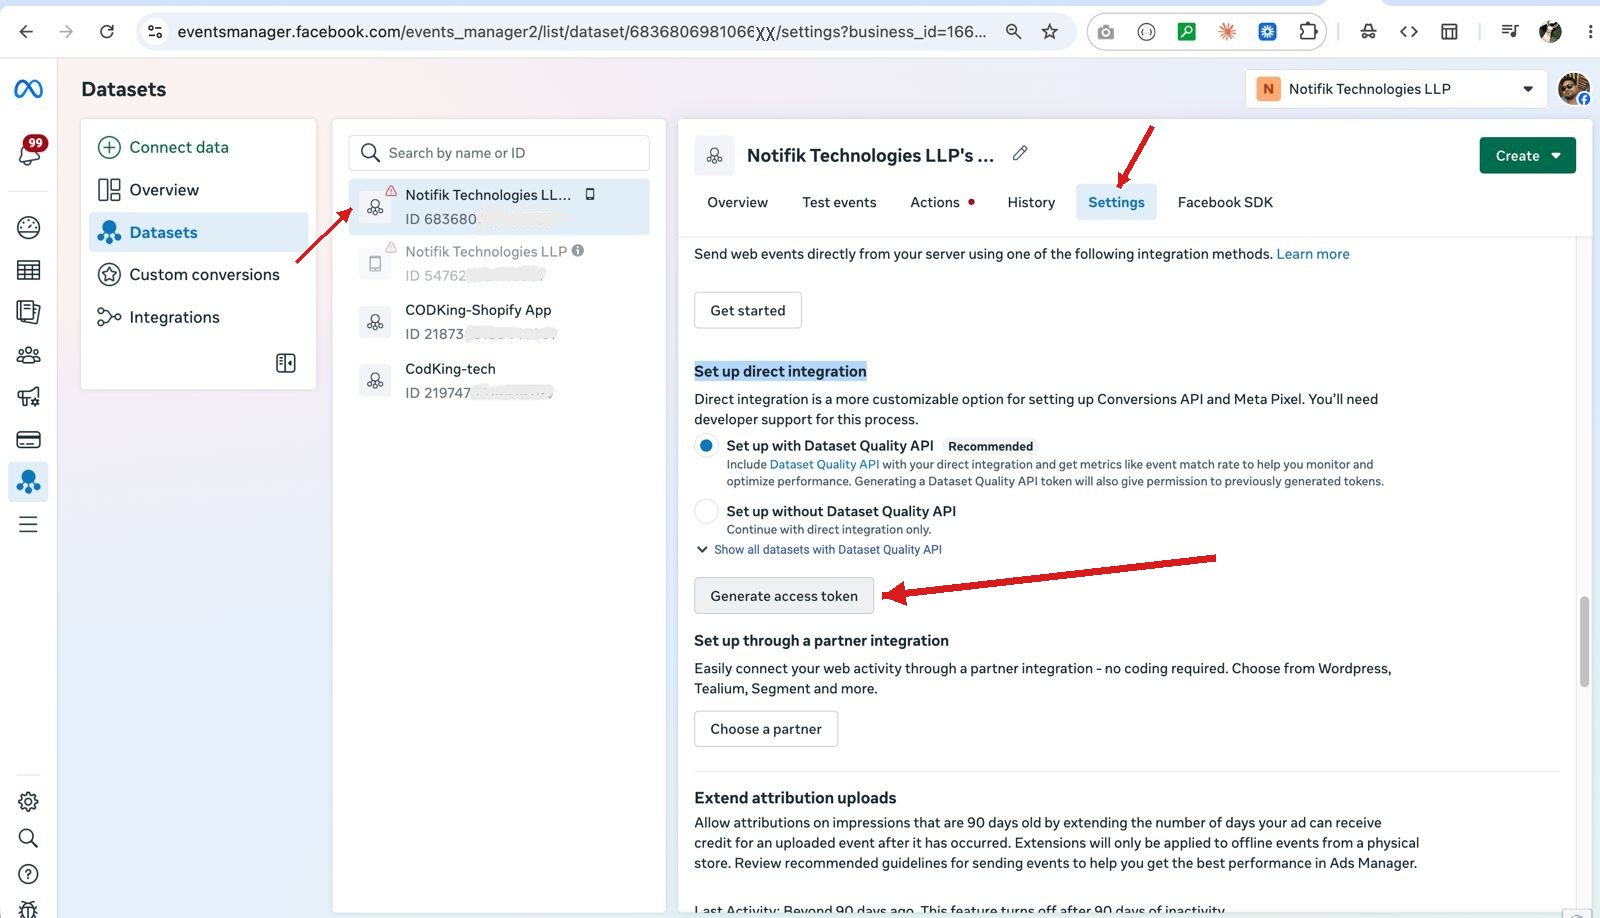 The generated Access Token is a sensitive credential. Never expose it in screenshots, public documentation, frontend code, GitHub repositories, or public messages. If a token is accidentally exposed, generate a new one from Meta Events Manager immediately.
## Step 4: Collect the Required Credentials
After completing the previous steps, the merchant should have both of the following credentials ready:
1. **Meta Dataset / Pixel ID** — identified from Shopify or Meta Events Manager in Step 1.
2. **Meta Conversions API Access Token** — generated from Meta Events Manager in Step 3.
These credentials are required to configure the **Meta integration with RabbitPay**. Keep both values available when you begin the Meta configuration step during RabbitPay onboarding.
## Verification
Before configuring RabbitPay, confirm that:
* The correct **Meta Dataset** has been selected.
* The **Dataset/Pixel ID** has been identified.
* The **Conversions API Access Token** has been generated.
* The Access Token has been **copied and stored securely**.
* Both credentials are **ready for RabbitPay configuration**.
## Security Notes
* Never expose the Meta Access Token publicly.
* Mask one or two digits of the Dataset/Pixel ID in documentation screenshots.
* Confirm that the selected Dataset belongs to the correct merchant before configuring RabbitPay.
* Do not include real Access Tokens in examples, tutorials, or support tickets.
If the Access Token is compromised, generate a new one from Meta Events Manager and update it in RabbitPay immediately. An invalid or replaced token will prevent server-side events from being delivered to Meta, resulting in gaps in conversion tracking.
## Next Steps
Connect your Shopify store with RabbitPay to enable 1-Click Checkout.
Set up Razorpay API keys and webhooks for payment processing.
The generated Access Token is a sensitive credential. Never expose it in screenshots, public documentation, frontend code, GitHub repositories, or public messages. If a token is accidentally exposed, generate a new one from Meta Events Manager immediately.
## Step 4: Collect the Required Credentials
After completing the previous steps, the merchant should have both of the following credentials ready:
1. **Meta Dataset / Pixel ID** — identified from Shopify or Meta Events Manager in Step 1.
2. **Meta Conversions API Access Token** — generated from Meta Events Manager in Step 3.
These credentials are required to configure the **Meta integration with RabbitPay**. Keep both values available when you begin the Meta configuration step during RabbitPay onboarding.
## Verification
Before configuring RabbitPay, confirm that:
* The correct **Meta Dataset** has been selected.
* The **Dataset/Pixel ID** has been identified.
* The **Conversions API Access Token** has been generated.
* The Access Token has been **copied and stored securely**.
* Both credentials are **ready for RabbitPay configuration**.
## Security Notes
* Never expose the Meta Access Token publicly.
* Mask one or two digits of the Dataset/Pixel ID in documentation screenshots.
* Confirm that the selected Dataset belongs to the correct merchant before configuring RabbitPay.
* Do not include real Access Tokens in examples, tutorials, or support tickets.
If the Access Token is compromised, generate a new one from Meta Events Manager and update it in RabbitPay immediately. An invalid or replaced token will prevent server-side events from being delivered to Meta, resulting in gaps in conversion tracking.
## Next Steps
Connect your Shopify store with RabbitPay to enable 1-Click Checkout.
Set up Razorpay API keys and webhooks for payment processing.